This sample uses a simpler radio than 1. Basic Radio Sample, but introduces the spatial components- RadioBroadcasters and RadioInsulators.
Accessing the sample
First, install the sample through Unity’s Package Manager. Navigate to Assets/Samples/Ryle Radio/[version]/Spatial Components, and open MainScene. It should look like this: 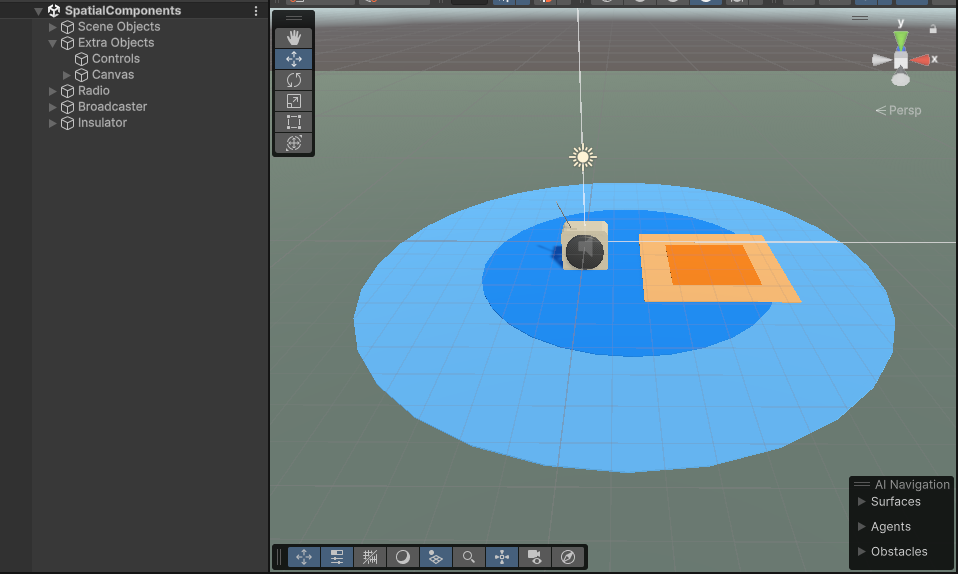
Description
Scene
The scene is our focus in this sample, unlike in the previous. Selecting the Radio object shows a RadioOutput again, this time with a far simpler RadioData linked to it, that simply plays the same track as constant- but this time with one difference: Force Global is unticked. 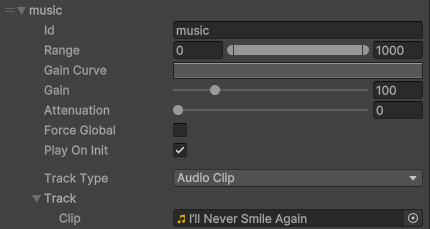 Having this option unticked forces us to use spatial RadioBroadcasters for our audio, instead of it being audible everywhere. What is a RadioBroadcaster you ask? Have a look here!
Broadcasters
The Broadcaster object contains a couple of child objects- circles, and a single RadioBroadcaster component. This component is the first of our spatial components that we use. 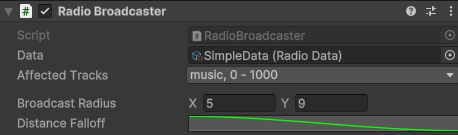 A RadioBroadcaster (usually known hereon as a broadcaster) creates a spherical area where certain tracks are audible- think radio towers in real life. The closer you are to the tower, the clearer the audio it’s broadcasting becomes. It works the same in Ryle Radio, but this time you have far more control over the tower’s range, falloff, and broadcasted track! Let’s go over the variables on this component.
Data
This is a reference to a RadioData object that this broadcaster is linked to. Each broadcaster can only be linked to one radio, so just add more of them if necessary. It needs to be linked in order to choose a track to broadcast- you’ll see this pattern a few times from hereon.
Affected Tracks
This is a multiselect variable that allows us to choose tracks that are affected by this broadcaster. For example, if we have three different tracks playing music at different tune values, we can broadcast all three at once with this one component!
Broadcast Radius
The broadcast radius is the range in which this broadcaster applies. There are two values here, though, as there are two radii we need to know. The first radius is the “inner radius” of the broadcaster- if an output is within this radius, it will hear the track at maximum broadcast power. The output could be anywhere, but so long as it’s within this many units of the broadcaster, it will hear the track. The second radius is the “outer radius”. If an output is outside of this radius, it will be unable to hear the track- this is therefore the maximum range of the broadcaster (unless you modify the Broadcast Power range- see below section). If an output is between the inner and outer radii, though, it will be progressively quieter depending on how far between them it is. That is, if you move an output from the inner radius to the outer, it will get progressively quieter until it’s eventually inaudible. You can see the two radii in the scene view when the broadcaster is selected! You can also drag them in the scene view like you would a normal collider. 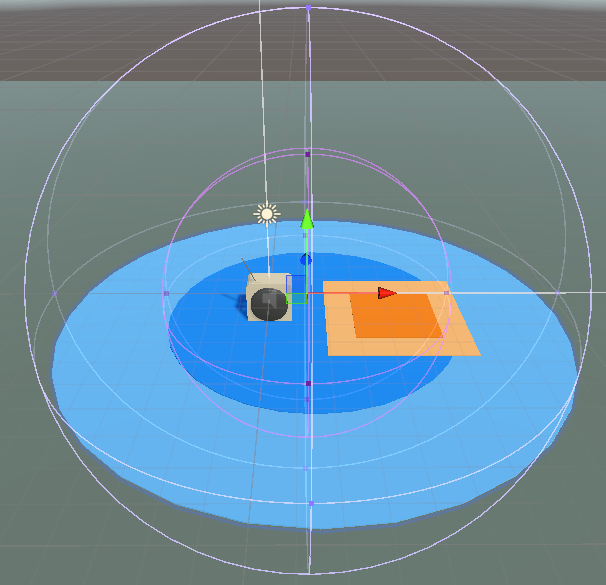
Broadcast Powers
This variable allows you to define the maximum and minimum broadcast powers used by the component. Unlike I’ve implied so far, the broadcast doesn’t necessarily get quieter until inaudible when moving between the inner and outer ranges- it moves from the highest to lowest points in this range! This means that you can have a broadcaster that doesn’t broadcast at the highest power when you’re inside the inner range, simply change the highest value on this variable. For example, the default range of 0 - 1 means that the broadcast is as loud as possible when inside the inner range, inaudible when outside the outer range, and somewhere between 0 and 1 when between the ranges. If it’s set to a range of 0.2 - 0.8, however, it behaves a little differently. If an output is inside the inner range, it will only be broadcasting at a power of 0.8 rather than as loud as possible. When it’s between the inner and outer range, it will be between 0.2 and 0.8. When it’s outside the outer range, it will still be 0 (unless you change a variable below)
Distance Falloff
The distance falloff is a curve showing exactly how the track will get quieter when moving between the broadcast radii. It’s the shape of the volume between the inner and outer radius. For example, if it’s a smooth graph like this, it’ll get quieter smoothly when moving between the radii.  For a linear graph like this, it’ll get quieter linearly between the radii.
  Something like this, though, would mean that an output between the radii would keep the track loud right up until it gets close to the outer radius- at which point it would start getting quieter.
  It’s a lot easier to understand how the falloff works when playing with it in realtime. Try moving it around with the scene in playmode, and see how the track changes when the radio is between the broadcast radii with different falloffs.
Apply to All Outputs Outside
This variable only appears when the lower value of the Broadcast Powers variable is > 0. When this is ticked, it effectively makes this broadcaster global with the lower power specified in Broadcast Powers. Let’s look back at the Broadcast Powers variable for this. If it’s set to the range 0 - 1, we cannot enable this variable- so we don’t have to worry about it. If it’s set to 0.2 - 1, though, this toggle becomes visible- and when it’s ticked, means that this broadcaster works everywhere- at a power of 0.2. That is, an output anywhere in the scene will be able to hear the tracks broadcasted by this component, but quietly. When the output moves into the range of this broadcaster, though, it will get louder! This allows you to have tracks that are both global and broadcasted- one you can hear quietly everywhere, but louder in a certain area(s)!
This particular Broadcaster
We can see that the broadcaster we have in this scene is set up to broadcast just one track- the music. It uses a generic falloff and a set broadcast radius. The blue circles in the scene are indicators to illustrate the radii of the broadcaster. Try entering playmode and moving the radio around in the blue area. You’ll notice that while it’s inside the inner circle, the music track is loud and audible. Once you move it between the inner and outer circles, it starts getting quieter depending on how close to the edge of the outer circle you are. Finally, once you move the radio out of the outer circle, the track is no longer audible. That explains Broadcasters! Try implementing them with your own tracks by modifying the Affected Tracks value on the radio to include any new tracks you create.
Wait, what’s that? What the hell is that orange square? Yes! This is our other type of spatial component in Ryle Radio, and is effectively the opposite of a broadcaster. It’s called a RadioInsulator!
Insulators
 RadioInsulators (known usually hereon as insulators) create a cubic area in which a track is quieter, rather than louder. Imagine you have a radio station broadcasting a song to a town, but one guy in the town puts his radio into a thick copper box. Why he has a copper box to begin with is up for debate, but the radio inside the box isn’t going to hear the song because the lead insulates it from radio waves. This is just like how they work in Ryle Radio. An insulator has the opposite effect to a broadcaster by preventing the track from being audible while an output is inside the assigned area. As such, now that we know how broadcasters work, it’ll be a lot easier for us to understand insulators.
Data
Same as in a broadcaster- the RadioData object this component is linked to. The insulator can only block tracks in this Data, so if you need tracks from another Data blocked, create another insulator.
Affected Tracks
Also the same as a broadcaster. You can choose which tracks are blocked by this insulator here!
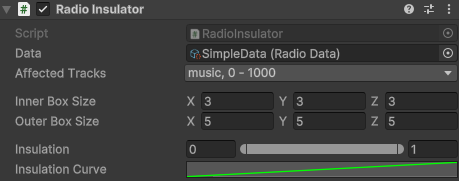
Inner Box Size
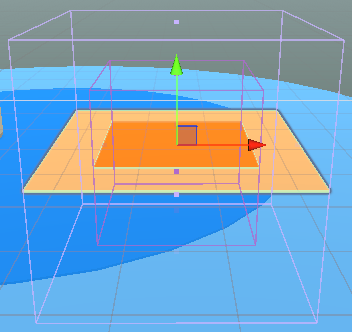 Scene gizmo is the darker box in this image This the area of the box in which insulation is at its strongest. If an Output is inside of this inner box, the insulation will be at the highest value you assign shortly below.
Outer Box Size
Scene gizmo is the lighter box in the above image This is the area of the box in which insulation fades away. If an Output is inside of this box but outside of the inner box, the insulation power will be somewhere in the range you set below. Make sure this is always bigger than the inner box, though! The math used here falls apart when the sizes are backwards. If you want it to get less insulated the further inside the box you go, use the Insulation Curve variable below.
Insulation
This is the important variable here- the range of insulation values that apply to this component! The higher value is the maximum insulation this component can provide- this will be applied when an output is inside the inner square of the component- that is, the lighter circle. The lower value is the minimum insulation it can provide before it jumps to 0. That is, if an output is precisely on the outer edge of this insulator, the selected tracks will be quieted with the lower insulation value. This doesn’t usually happen in practice, and the lower value is more about what the insulation will be when an Output is between the inner and outer boxes. If it’s halfway between the two boxes, for example, insulation will be halfway along the range you provide.
Insulation Curve
This is very similar to the broadcast falloff curve, but rather refers to the insulation between the inner and outer boxes. For example, this means the insulation will get progressively stronger the further between the boxes you go:  And this means the insulation will get stronger quickly but smoothly when you enter the outer radius:
  This, however, means that insulation will be quieter inside the inner box than outside. A lot like a cubic broadcaster (but could be very confusing to maintain if you use it for that purpose)
  You usually won’t be using this option as much as broadcast falloff, but it’s nice to have in case it turns out useful for some application.
Apply to All Outputs Outside
This option only shows when the lower value of the insulation range is above 0. When it’s ticked, it means that everywhere in the scene outside of the outer square will still be affected by the lower level of insulation- basically making it global. For example, ticking the box here with values like this means that everywhere in the scene the insulation will be at 0.2- except inside the insulator’s boxes, where it will be somewhere between 0.2 and 1.  In short- pretty much the same as the broadcaster equivalent.
This particular Insulator
The insulator in this scene is set up to block the music track within its area. Moving the radio in and out of it at runtime will make the music quieter then louder depending on how far into the insulator it is! Just like the broadcaster in this scene, we use coloured shapes to illustrate the area- in this case, the orange squares reflect the inner and outer boxes of this insulator. You can adjust the box sizes too to hear the effects. Play around with the Insulation value to hear the difference depending on where the output is. Insulators, like broadcasters, are pretty straightforward once you know what they do- and conveniently, you probably won’t need to use insulators as much :)
The whole scene
What is the rest of the scene, then? In this particular sample, we have set up an broadcaster and an insulator around an output to hear how they affect the output. Using the Q and E keys at runtime will move the radio to the sides, allowing easy comparison of the sounds. The code for the motion is on the Extra Objects » Controls object, and is just some simple transform modification. The rest of the scene is basically fodder except for the radio components. You can also check the RadioData object for this scene, which is very simple compared to the last sample’s. You can add to it and play around with broadcasters and insulators that do and don’t affect it!
The whole scene is effectively a segue to show you how the broadcasters and insulators work, and it would definitely be worth adding some new components and moving things around if you need to get a feel for it, as limiting motion to left/right is a little restrictive lol
Now we know how to use radio components to change how the audio plays depending on positions! This should help add a lot of definition and complexity to your radios already. But what if I want the radio to.. y’know.. do stuff? Like play songs when I tell it to, or turn a light on when a certain track is playing? That’s what the next sample is for!
Guide over :)
That’s the end of the guide for this scene! Hopefully this helped your understanding of the spatial components, what they’re for, and how to use them.
Just like in the last sample, if you’re having any issues with components or the scene, first check (Predicted) Common Issues and Questions- if that doesn’t help, contact me and I’ll hopefully be able to lend a hand.
Next is 3. Interaction Components Sample :)